How to Create WCF RIA Service
Let us understand more about the WCF RIA service by creating Silverlight client application which read and updated the Employee details from WCF RIA Service.
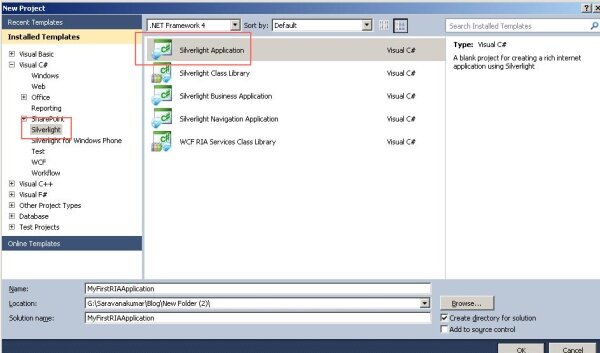
Step 1:Start the Visual Studio 2010 and click File -> New-> Project. Enter the project name and click “Create” 
Step 2:Select “Enable WCF RIA Services”. This will make your Silverlight application to user WCF RIA service 
Step 3:Create “Data” folder and add DataModel” class as shown below. This is the data class which will return list of Employee and update the employee list
Data Model class:
   public class Employee
    {
        [Key]
        public int EmpId { get; set; }

        public string Fname { get; set; }

        public string Lname { get; set; }

        public DateTime JoinDate { get; set; }

        public int Age { get; set; }
    }


    public partial class EmployeeData
    {
        private static readonly EmployeeData _instance = new EmployeeData();

        private EmployeeData() { }

        public static EmployeeData Instance
        {
            get
            {
                return _instance;
            }
        }


        private List < Employee > empList = new List < Employee>()
        {
            new Employee() { EmpId  = 1, Fname = "Sam", Lname = "kumar",
                            JoinDate=new DateTime(2010,7, 21), Age=30},
            new Employee() { EmpId = 2, Fname = "Ram", Lname = "kumar",
                            JoinDate=new DateTime(2009,6,8), Age=35},
            new Employee() { EmpId = 3, Fname = "Sasi", Lname = "M",
                            JoinDate=new DateTime(2008,3,5), Age=39},
            new Employee() { EmpId = 4, Fname = "Praveen", Lname = "KR",
                            JoinDate=new DateTime(2010, 5,1), Age=56},
            new Employee() { EmpId = 5, Fname = "Sathish", Lname = "V",
                            JoinDate = new DateTime(2006,12,15), Age=72},
            new Employee() { EmpId = 6, Fname = "Rosh", Lname = "A",
                            JoinDate=new DateTime(2009,2,2), Age=25}
        };

        public IEnumerable< Employee > EmployeeList
        {
            get
            {
                return empList;
            }
        }


        public void Update(Employee updEmployee)
        {
            Employee existing = empList.Find(p => p.EmpId == updEmployee.EmpId);

            if (existing == null)
                throw new KeyNotFoundException("Specified Employee cannot be found");

            existing.Fname = updEmployee.Fname;
            existing.Lname = updEmployee.Lname;
            existing.JoinDate = updEmployee.JoinDate;
            existing.Age = updEmployee.Age;
        }
    }
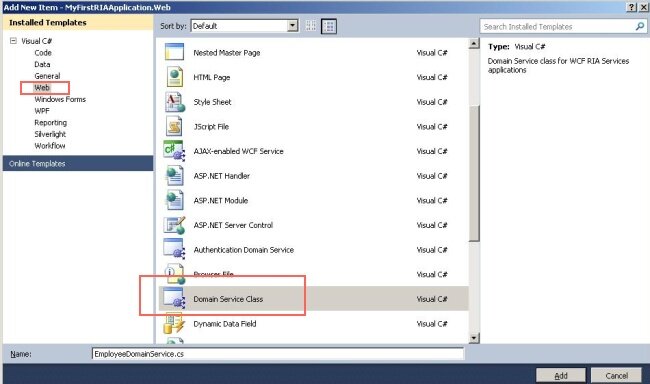
Step 4:To expose the Employee related operation to the client side, Create domain service class. By right click project file and select Add new item. 
Step 5:Add code to return the Employee list
Domain Service class:

// TODO: Create methods containing your application logic.
    [EnableClientAccess()]
    public class EmployeeDomainService : DomainService
    {
        //Create instance of the Data access layer
        private EmployeeData data = EmployeeData.Instance;

        public IEnumerable< Employee> GetEmployee()
        {
            return data.EmployeeList ;
        }

        public void UpdateEmployee(Employee emp)
        {
            data.Update(emp);
        }
    }
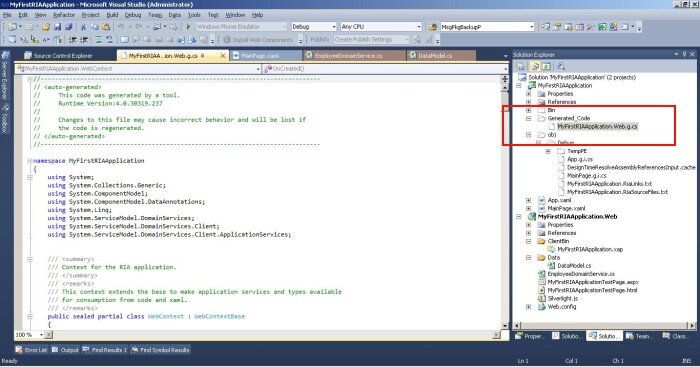
Step 6:Compile the solution – After compilation RIA service will generate the application logic at the client side using DomainContext object. Enable show all files option for the solution and view the auto generated code. 
Step 7:View the DomainContext class are created at the client side.
Domain Context class at client:
   ///
    /// The DomainContext corresponding to the 'EmployeeDomainService' DomainService.
    ///
    public sealed partial class EmployeeDomainContext : DomainContext
    {

        #region Extensibility Method Definitions

        ///
        /// This method is invoked from the constructor once initialization is complete and
        /// can be used for further object setup.
        ///
        partial void OnCreated();

        #endregion


        ///
        /// Initializes a new instance of the < see cref="EmployeeDomainContext"/> class.
        ///
        public EmployeeDomainContext() :
                this(new WebDomainClient< IEmployeeDomainServiceContract>(new
                              Uri("MyFirstRIAApplication-Web-EmployeeDomainService.svc",
                                                        UriKind.Relative)))
        {
        }

        ........
        ........
Step 8:Add DataGrid to Main.xaml file to display the employee details query from DataModel and add two buttons to update and reject the data changed from client side.
Main.xaml
 < Grid x:Name="LayoutRoot" Background="White">
        < StackPanel Orientation="Vertical" HorizontalAlignment="Left"  >
        < sdk:DataGrid x:Name="EmployeeGrid" AutoGenerateColumns="True"
                        RowEditEnded="EmployeeGrid_RowEditEnded" />
            < Button Content="Accept" Height="23" Name="btnAccept"
                        Width="75" Margin="5" Click="btnAccept_Click"  />
            < Button Content="Reject" Height="23" Name="btnReject"
                        Width="75" Margin="5" Click="btnReject_Click"/>
        </StackPanel>
    </Grid>


Main.xaml.vb

 public partial class MainPage : UserControl
    {
        //create instance of Doman context class
        EmployeeDomainContext ctx = new EmployeeDomainContext();

        public MainPage()
        {
            InitializeComponent();
            //Load query data , Read data from DAL layer to UI
            EntityQuery< Employee> query = ctx.GetEmployeeQuery();
            LoadOperation< Employee> lo = ctx.Load< Employee>(query);
            EmployeeGrid.ItemsSource = lo.Entities;
        }

        private void EmployeeGrid_RowEditEnded(object sender,
                                DataGridRowEditEndedEventArgs e)
        {

        }

        private void btnAccept_Click(object sender, RoutedEventArgs e)
        {
            //Update the DAL with user changes
            ctx.SubmitChanges();
        }

        private void btnReject_Click(object sender, RoutedEventArgs e)
        {
            //Roll back the user changes
            ctx.RejectChanges();
        }
    }
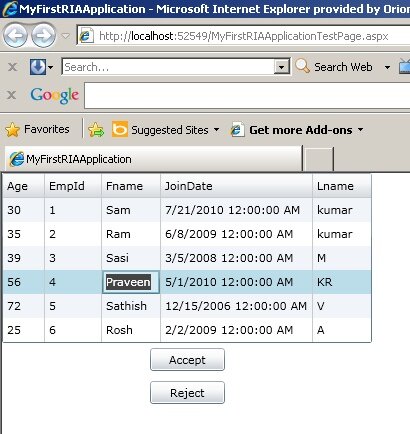
Step 9:Run the application and see the output as shown below 
Tips!
- Always create the service with Interface->Implementation format, mention the contract in Interface.
- Define the service in Class library and refer the class library in Host project. Don’t use service class in host project.
- Change the instance mode to per call as default.
- Always catch exception using try/catch block and throw exception using FaultException < T >.
- Logging and Include exception should be enable while compiling the project in debug mode. While in production deployment disable the logging and Include exception details.
|